How I Connected Figma MCP to Claude and Automated My Design System Workflow
A practical walkthrough of how I got Figma talking to Claude, and what it actually changed about my day-to-day design system work.
Design tokens drift. Devs copy-paste hex values instead of using named tokens. Figma specs and the actual product quietly stop matching. I set up Figma MCP with Claude and that loop mostly stopped. Here's the exact setup.
What is MCP? (30-second version)
MCP is an open protocol that lets AI tools connect to external apps like Figma. Think USB-C for AI. We're using the open-source Framelink MCP server, which pulls data from the Figma API and strips it down to just the layout and style info the model actually needs.
Prerequisites
- Node.js 18+ installed (run `node -v` to check)
- A Figma account with at least one design file
- Claude Desktop app — or Cursor, VS Code, or any MCP-compatible client
- ~10 minutes
Step 1 — Generate a Figma Personal Access Token
You need a Figma token so the MCP server can read your files.
- In Figma, click your profile avatar (top-left) → **Settings**
- Go to the **Security** tab
- Scroll to **Personal access tokens** → click **Generate new token**
- Name it anything (e.g. `claude-mcp`) and give it **Read** access on both **File content** and **Dev resources**
- Copy the token — you won't see it again
Step 2 — Configure the MCP Server
Add the Figma server block to your MCP config file. Swap `YOUR-KEY` for your token.
Claude Desktop (macOS / Linux)
Edit `~/Library/Application Support/Claude/claude_desktop_config.json`:
{
  "mcpServers": {
    "Framelink Figma MCP": {
      "command": "npx",
      "args": ["-y", "figma-developer-mcp", "--figma-api-key=YOUR-KEY", "--stdio"]
    }
  }
}
Claude Desktop (Windows)
Edit `%APPDATA%\Claude\claude_desktop_config.json`:
{
  "mcpServers": {
    "Framelink Figma MCP": {
      "command": "cmd",
      "args": ["/c", "npx", "-y", "figma-developer-mcp", "--figma-api-key=YOUR-KEY", "--stdio"]
    }
  }
}
Cursor
Open Cursor Settings, go to MCP, paste the same config block, save, and restart.
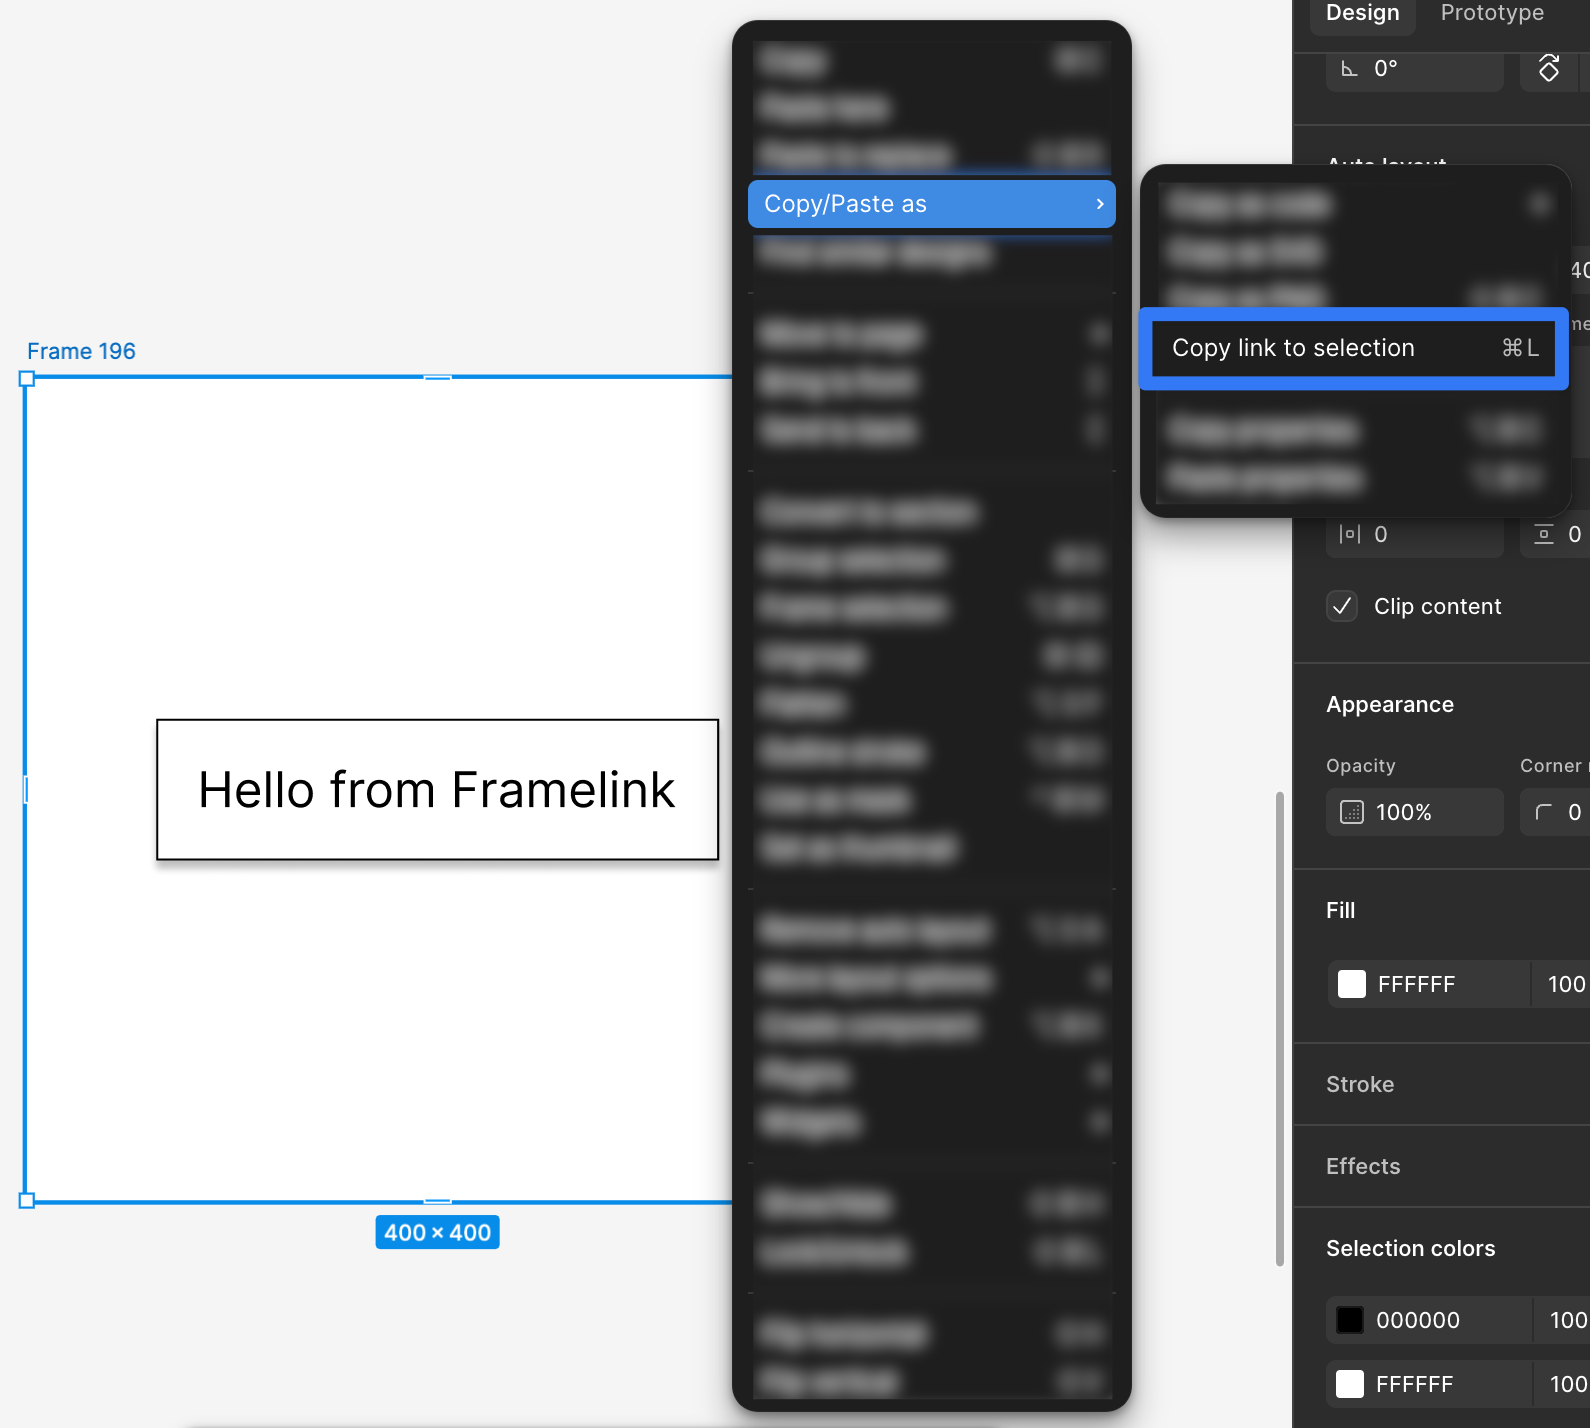
Step 3 — Copy a Link to Your Figma Frame
Work one frame or section at a time, not a whole page. Right-click the frame, go to Copy/Paste as, and choose Copy link to selection.
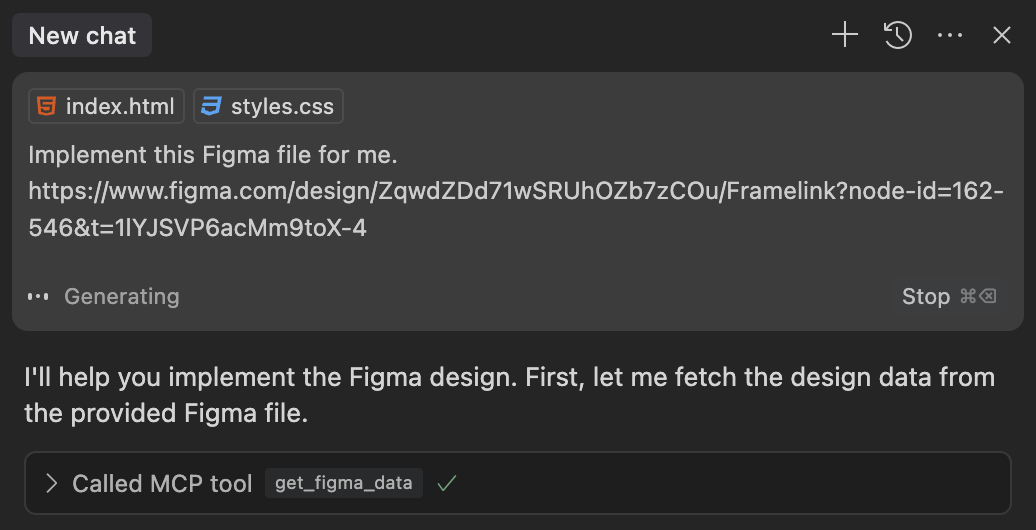
Step 4 — Paste the Link into Claude
Open Claude, start a new chat, paste the link, and tell it what to do:
Implement this Figma frame as a React component using Tailwind CSS:
https://www.figma.com/design/YOUR-FILE-ID/...?node-id=123:456
Claude calls `get_figma_data`, gets back the layout and style data, and writes the code. Simple as that.
Step 5 — Extract Design Tokens
Skip the UI generation. Ask Claude to pull your token definitions directly from the file:
Read this Figma file and extract all color styles, text styles, and spacing values as a
design token JSON that follows the W3C Design Token spec. Group by category: color,
typography, spacing, border-radius, shadow.

https://www.figma.com/design/YOUR-FILE-ID/Design-System?node-id=0:1
Tested on a system with ~80 components. Clean JSON in under 30 seconds:
{
  "color": {
    "brand": {
      "primary": { "$value": "#1A7DD4", "$type": "color" },
      "primary-dark": { "$value": "#0C3A5E", "$type": "color" },
      "surface": { "$value": "#EAF2FB", "$type": "color" }
    },
    "semantic": {
      "success": { "$value": "#1A6B35", "$type": "color" },
      "warning": { "$value": "#E8A020", "$type": "color" },
      "danger": { "$value": "#D94F4F", "$type": "color" }
    }
  },
  "typography": {
    "heading-xl": {
      "$value": {
        "fontFamily": "Instrument Serif",
        "fontSize": "64px",
        "fontWeight": 700,
        "lineHeight": 1.1
      },
      "$type": "typography"
    },
    "body-base": {
      "$value": {
        "fontFamily": "Poppins",
        "fontSize": "16px",
        "fontWeight": 400,
        "lineHeight": 1.6
      },
      "$type": "typography"
    }
  },
  "spacing": {
    "xs": { "$value": "4px", "$type": "dimension" },
    "sm": { "$value": "8px", "$type": "dimension" },
    "md": { "$value": "16px", "$type": "dimension" },
    "lg": { "$value": "24px", "$type": "dimension" },
    "xl": { "$value": "40px", "$type": "dimension" },
    "2xl": { "$value": "64px", "$type": "dimension" }
  }
}
Pipe that straight into Style Dictionary, your Tailwind config, or CSS custom properties. Half a day of work, one prompt.
Step 6 — Auto-Generate Component Documentation
Point Claude at a component set and ask it to write the docs. Really useful for onboarding.
Look at this Figma component set and write markdown documentation for it. Include:
- Component name and description
- Props table (name, type, default, required, description)
- All variant combinations with brief usage note
- Accessibility notes (keyboard nav, ARIA roles, contrast requirements)
- Do/Don't examples as a two-column list

Figma link: https://www.figma.com/design/YOUR-FILE-ID/...?node-id=456:789
Review the output before shipping. Prop types need checking. But 80% done in seconds beats a blank page.
The Result
Reading specs, translating values, writing the markup. That used to take 2-3 hours. Now it takes however long Claude needs to respond.
The Reverse Workflow: Claude → Figma
Got code but no Figma file? Works in reverse too. Paste your component and ask:
Here's my existing Button component. Draft a Figma component spec for it as a
detailed written brief: frame names, auto-layout settings, color style names,
variant property names and values, all prop-to-variant mappings. The goal is
for a designer to use this brief to build the Figma equivalent.
Not as seamless as Figma-first, but a great shortcut for legacy codebases. Bonus: Claude usually catches naming inconsistencies nobody noticed.
What This Doesn't Solve
This doesn't fix everything. A few things still need you:
- **Interactive states** like hover, focus, and drag aren't fully captured in static frames, so you'll need to fill those in yourself
- **Motion specs** — Figma's prototype data isn't exposed by the MCP server yet
- **Large files** work much better section by section. Trying to process 200 frames at once will get you degraded results
- **Design intent** is invisible to Claude. It can read what's there, not why. Write decisions into your Figma frame descriptions so they show up as context
Quick Summary
MCP won't fix how people communicate. But it does remove the manual translation step where most of the drift was coming from.
If you try this and find something that works better, I'd like to know.